Complete Guide to Flash Photography for BeginnersFlash photography isn't just a back-up for shooting in low-light conditions; correct use of flash can improve photos even if they are taken in broad daylight. This guide shows you how to use a built-in flash as well as hot shoe, off axis and macro flash guns.
This article is part of a series of articles. Please use the links below to navigate between the articles.
- Introduction to Photography Course - Definition & Types of Photography
- How Cameras Work and Terminology Explained for Beginners
- What is the Exposure Triangle and How Does It Affects Exposure?
- Understanding Camera Shutter Speed for Beginners
- Aperture and Depth of Field in Photography Explained
- What is Digital Photography ISO and Grain?
- How to Understand Camera Lenses and Focal Length
- Essential Photography Composition Rules To Improve Your Photos
- Camera Metering Modes Demystified - Which One To Use
- Camera Shooting and Exposure Modes Explained
- Complete Guide to Flash Photography for Beginners
- When and How To Use A Camera Tripod In Photography
- What Are White Balance And Colour Temperature Camera Settings?
- How to Use Camera Histograms in Photography for Perfect Exposure
- Master These 10 Camera Settings For Your Best Photographs
- Why You Should Be Shooting in RAW - Reasons and Benefits Explained
- Essential Photo Editing Techniques to Enhance Photographs
- Complete Guide to Macro Photography for Beginners
- Beginners Landscape Photography Guide for Stunning Photos
Flash photography may seem a little daunting at first, but there is a lot of equipment and accessories out there. Maybe you've tried using a built-in flash and had poor results and want to get better photos in low-light situations, or you want to experiment and get creative. This flash photography guide will show you the basics of flash photography, the different types of flash, the settings to use and some techniques for getting the most out of your flash.
This guide was written using Canon equipment, however, all flash function in the same way and have very similar terminology.
Flash Photography Basics - What is a Flash?
Simply put, a flashgun is a way of creating a flash of light at the exact time as the camera shutter is open. To create a photograph, the camera needs light and the most basic usage of the flash is to provide more light. In low-light scenes, the flash illuminates the subject with a brilliant light which is more than enough to capture an image. Without flash, you would need very long exposure settings, which are often impractical.
Flashguns can also be used to enhance scenes which would normally photograph well, but there may be an undesirable shadow or the lighting can be improved. Examples of this are photography in direct sunlight. The sun creates very harsh shadows, and careful use of the flash can "fill in" the shadows creating a smooth even light. Flash can also be used to add extra highlights to a scene.
Finally, flash photography allows you to get creative. You can not only illuminate your subject but by using filters change the colour of the light, or use objects or screens to create shadows or masks. Certain flash modes which we'll cover later allow you to capture dynamic movement with great results. We'll cover this in more detail later, first let's look at the types of flash available.
Camera Flash Types
There are many different types of flashguns available; each one has its advantages and disadvantages.
Built In Flash
The standard built-in flash is the one you are probably most familiar with. The flash is typically small and low-powered, or even a LED in the case of smartphones. More advanced cameras feature a pop-up flash. This not only increases the coverage it also helps reduce red-eye (see below). Standard flashes are OK for most people and in close proximity they work well. They are however usually very limited in control and are not very powerful so they do not have a very good range.
External Hot Shoe Flash
External "hot shoe" flash is the first upgrade from the standard flash. They come in many different sizes and power options and use their own batteries, extending the life of your precious camera battery. External flashes offer much greater control over the flash and even have different modes, similar to the camera for different effects. We'll cover these later. External flashes are bulky to transport and add to the overall weight of your camera. Not all cameras support external flashes so check with your manual to see what is supported.
Macro Ring Flash
Macro flashes often offer similar functionality to that of the external hot shoe flash, however, they typically attach to the front of the lens instead of the camera body. This is because, at close macro distances, the lens would obstruct the flash and cast a shadow onto the subject.
Macro flash rings are also good for portrait photography as they not only create a softer light, but the ring shape looks much more aesthetically pleasing when reflected in a model's eyes.
Studio Flash / Strobe
The studio flash is the granddaddy of all flashes. They are very large and require their own tripod and mains power supply. They also cost a small fortune, however in a studio setting they allow precise control over lighting. They can have an enormous range and can be used for everything from individual portraits to commercial vehicles and interior shots.
Macro Ring Flash
As discussed before, the macro ring flash is the same as a hot shoe flash with the exception that it is attached to the front of a macro lens. This prevents the lens from getting in the way of the flash at very close distances. Macro ring flashes can usually only be attached to specific lenses that support the ring flash mount, although you may be able to get an adapter which screws into the filter ring.
Ring flashes are also good for portrait photography as the light produced is usually soft and the ring creates a pleasing halo shape in the eyes of your model. The angle between the flash and the subject is also near zero so there are little shadows created.
Off-Axis Flash
One of the main advantages of a hot shoe external flash is the ability to use it off the camera body. Using a wireless trigger or sync cable, you can position the flash anywhere around your subject - even from behind. This can be used to create lots of different lighting effects such as a backlight or sidelight and has the most options for creativity.
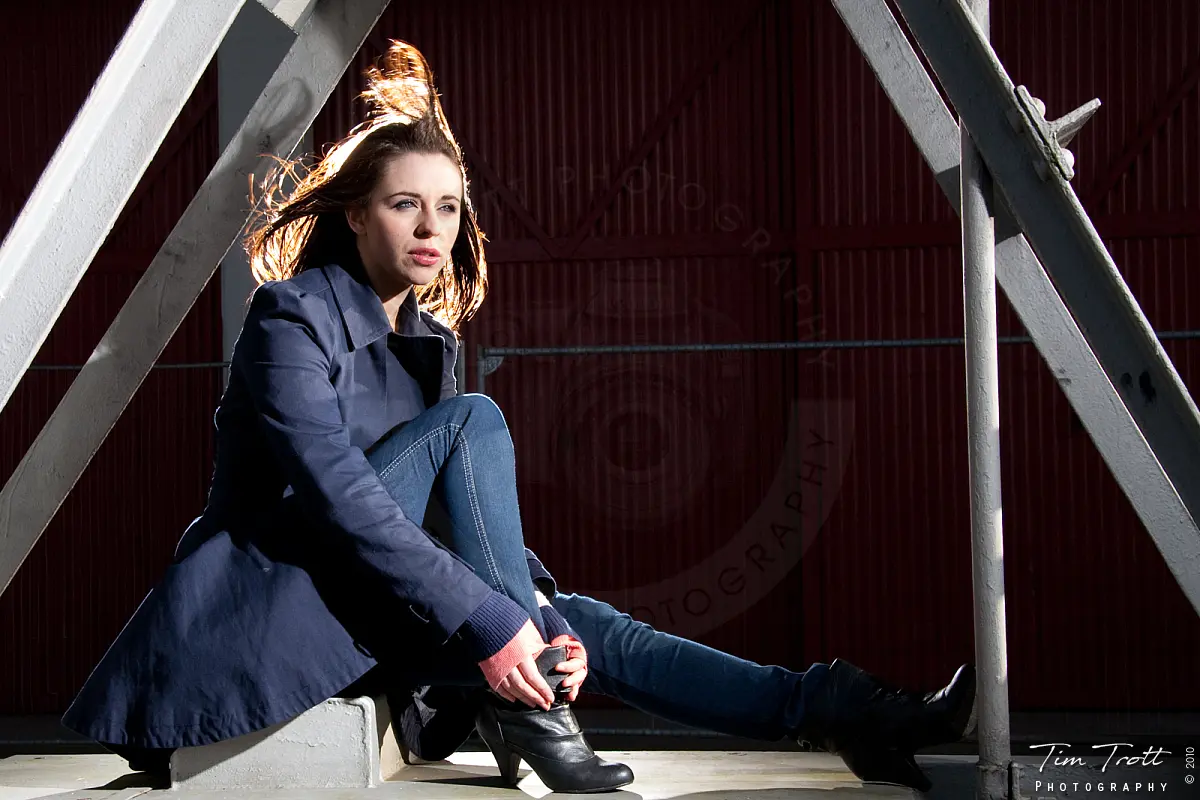
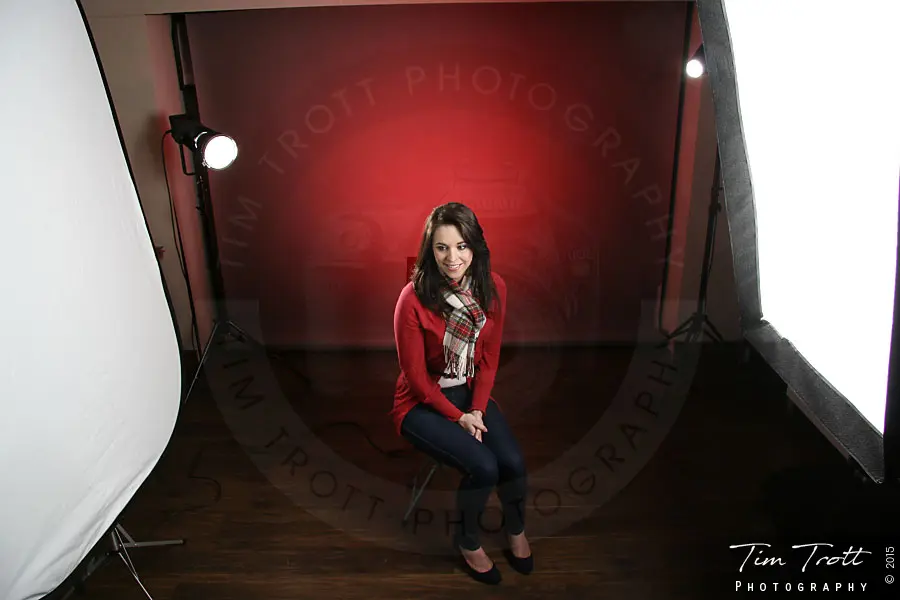
In the examples below an off-axis flash was used with a red filter positioned behind her to illuminate the backdrop, while a second flash highlights her shoulder and hair. In the other photos, the off-axis flash was positioned to highlight her hair blowing in the wind and positioned in front of her, and to the side of the camera, to cast a shadow.
Flash Triggers
External flashes can be triggered in a variety of ways. The simplest is the direct connection to the camera or the use of an extension cable. For controlling flashes over greater distances infra-red or wireless triggers can be used. These allow control over multiple flash units as well and on high-end triggers, independent control over multiple flash units.
Studio Flash
Studio flashes are the big brothers to off-axis flash, but much larger and much more powerful. They usually are powered directly from the mains or large batteries. They are not portable and require their own tripods. The level of control and versatility of a good studio flash (or strobe light) is unprecedented. Often multiple strobes are combined; sometimes with off-axis flash guns to gain complete control over the lighting.
Flash Photography Camera Settings
Depending on the types of flash used, not all settings will be available, or you may have additional settings. These are the most common settings found on the average flash units.
Auto Mode - As suggested this setting places the flash into automatic mode and it will attempt to adjust settings to match what it thinks is correct for the scene.
Red Eye Reduction - Red Eye occurs when the flash bounces off the back of a person's (or animal's) retina. In dark situations when the flash is most likely to be used, the iris is opened wide to allow light in. This maximises the amount of light let into the eye, but also the reflected back from the retina. Red-Eye reduction works by firing the flash twice - once before the shot and again during the shot. The first "pre-flash" tricks the iris into closing, thereby reducing the visible part of the retina.
Fill-in Flash - Also known as flash on or forced flash, this setting forces the flash to fire every time, even if there is enough available light to take the picture without flash. This mode is used to "fill in" shadows when taking photos in direct sunlight or to add details and highlights to a photo.
High Speed Sync - Flashes normally work at between 1/60 and 1/200 shutter speeds. Exposure is mainly controlled by the flash itself. Sometimes, however, you may want to use a faster shutter speed, but unless your camera and flash support high-speed sync, you'll end up with dark bands across the photo. This is caused due to the flash duration illuminating when the shutter is opening and closing. The shadow is actually the shutter not fully opened.
Exposure Compensation - Allows you to manually control the amount of flash cast over your subject without changing the camera's aperture or shutter speed.
Exposure Bracketing - Similar to auto exposure bracketing, this setting takes multiple shots with slightly different exposures, usually -1/0/+1 stops.
Front and Rear-Curtain Sync - Important for capturing motion in an image. Normally the flash will trigger when the shutter is fully open. With slow shutter speeds, there is a delay between the shutter opening and the shutter closing (curtains). Within this delay, we can choose when to fire the flash. Front sync fires the flash as the shutter is opened, while rear fires when the shutter closes. If there is motion in the photo - in this example a runner if we use the front curtain sync the flash fires and the shutter remains open as the subject blurs away from the flash. In rear sync, there is a blur up to the flash.
Flash Diffusion and Bouncing
If you've taken photos indoors you will probably know that the flash is very harsh and can make the image flat, or washed out. This can be improved by using a diffuser or "bouncing" the flash. By this, I don't mean dropping it! Flash diffusers come in all shapes and sizes for all budgets. Here are the most common.
DIY or Home Made
The cheapest is a piece of paper sellotaped over the flash. I've used this technique many times with great effect and it works well for popup flashes where you cannot buy diffusers. Be careful not to allow the paper to touch the flash, as the heat produced can be quite intense. Not only can you potentially set fire to the paper, but also it will damage your flash.
Push On
Another type is the push-on or clip-over for external flash. These push onto the flash head and are quite easy to clip on and off. They are also quite cheap and sold by most camera shops.
Soft Box Extender
For a little more money, a soft box extender provides a nice soft flash ideal for portraits. You can get different sizes and colours to control the light.
Umbrella
The umbrella diffuser is used with studio flashes or strobes which can be very harsh. They are positioned so that the flash fires into the umbrella and then bounce out onto the subject with a lovely soft light.
Flash Bouncing
Bouncing a flash is a technique for external and studio flash. It involves directing the flash head towards the ceiling or wall where it is then diffused back down onto the subject. Varying the angle can create different effects and you can adjust how diffused or harsh the light is.
How to Effectively Use Flash
Correct flash usage can make or break a photo. Flash is a great way to add drama to your images and really add a pop to them. It can fill in harsh shadows, illuminate your subject or make them stand out.
In automatic modes, the built-in flash will automatically pop up and trigger when the camera thinks it is needed. This isn't always the best. I've had my camera on auto, outdoors in the sun photographing a landscape and the camera decides that the flash is needed. Other times when I want the flash the camera thinks I don't. If you shoot in automatic mode and the flash keeps popping up when it's not needed, there is usually an automatic mode without flash. Sometimes this is indicated by a flash crossed out. If the flash doesn't pop up then you can usually press a button to manually release it. The flash should then fire when you take a photo.
Always use red-eye reduction when photographing people or animals with the flash.
When using a hot shoe flash it's best to shoot in manual. By bouncing the flash you will get the best results in the shortest amount of time. This is where you bounce your flash off of a large surface such as the ceiling or a large wall. White walls work best as darker walls will tend to swallow your flash power and also has the potential to create a colour cast on your image.
Flash Photography Settings Cheat Sheet
The settings below should be used as a rough starting point, although you may need to adjust them slightly according to your scene.
- Aperture - Set this to around f/8.
- Shutter Speed - Set to 1/200. On most cameras, this is the fastest you can go with flash.
- ISO - Use the lowest ISO to reduce noise as much as possible. ISO 100-200 is ideal.
- Flash power - Set the flash power to 1/16. You should refer to your flash manual for the procedure on this.
Take a test shot and you can easily adjust the exposure based on the results from that first image.
Always have spare batteries, and spares for your spares. Flash drains batteries FAST. Start with a lower flash power to start with, increase if necessary. This will increase battery life and flash recycle time (the time the flash takes to recharge before it will fire again).


