How to Edit Your Photos Like a Pro in Adobe LightroomTake your photography to the next level with Adobe Lightroom! This guide teaches you how to edit your photos and achieve stunning results.

By harnessing the power of Adobe Lightroom, you can elevate your photography skills to new heights. This comprehensive guide will equip you with the knowledge to use Lightroom like a pro, enabling you to transform your photos into stunning masterpieces that captivate your audience.
Understand the Basics of Lightroom
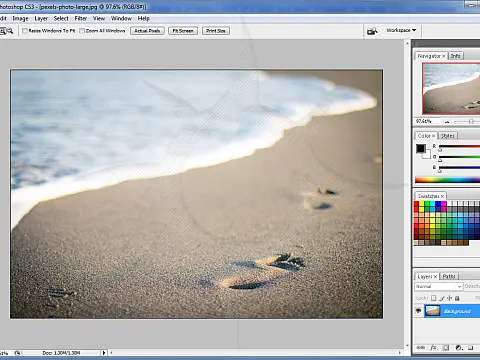
Before you start adjusting photos in Lightroom, empower yourself by learning the basics of the software. Lightroom is a powerful application that allows you to adjust your photographs' exposure, contrast, colour, and other parameters. It's a lossless editor, meaning no changes are made to the original. Lightroom applies changes dynamically via a stack, retaining the original and allowing you to make any alterations without undoing subsequent revisions. Presets and batch editing are also available in Lightroom, which can save you time and help you establish a consistent style throughout your photographs. Take some time to explore the interface and become acquainted with the various tools and choices available, and you'll feel in control of your photo editing process.

Adobe Lightroom Workflow
A Lightroom workflow for organising and processing your photographs is essential for producing consistent results, preventing file loss, and staying organised. A Lightroom workflow is a series of steps that gives you a consistent technique for taking pictures you've created with your camera and producing your finished product, with the ability to backup, organise, and conveniently retrieve files, which is an essential component of this process.
This is my Adobe Lightroom workflow, a series of steps I have refined over many years. You may want to skip some or add some additional steps to your workflow, but these should serve as a good starting point.
Copy Files from Camera to Main Storage
Adobe Lightroom has the feature to import photos from a digital camera or memory card automatically. However, I prefer to copy files manually onto my primary storage device and run an import from there separately. This gives me more control over the file naming and folder structure.

Depending on what I am shooting, I enjoy the freedom and flexibility of using a location-based folder structure or a category-based structure. I have folders for each continent for location-based shoots, such as travel photography, then narrowed down by country and region to the city level, if appropriate. For other subjects, I will categorise them into things like nature and wildlife, transport, or objects. These are then broken down into categories: animals, birds, birds of prey, and red kites. Regardless of the preceding folder structure, I will create a date-based folder to store the images because I know I will take more in the future, which will help locate newer or older photos. Lightroom's flexibility in organising photos gives me a sense of liberation and control over my photo library.
An example folder structure shows how nature images are organised on my primary storage device.
Importing Files and Pruning Duds
Once I have all my photos copied off and organised into their folders, I run the Lightroom Import Photo Wizard from the File Menu > Import Photos and Video.... On this screen, I navigate to the newly created folder and select all the photos to import. Photos already imported will appear faded or greyed out and will not be imported again. Sometimes, many images to be imported are scattered among various folders. In that case, I will select the root folder and let it scan everything to find new images to import.
Once the photos have been imported, Lightroom will create a smart collection called "Previous Import" to show each photo imported. From here, I switch to the full-size preview and review each one. Lightroom lets you pick or reject pictures, so I mark each dud photo as rejected using the X key on the keyboard. A dud photo is anything blurry, out of focus, with a terrible composition or something I otherwise don't want to keep. I will pick pictures using the P key for the best photos that I want to continue processing. I'll keep the rest of the images but not do anything for now.
Once I have gone through all the photos in the import, I will change the filter to show me all the photos I rejected. Then, I'll delete them from the Lightroom catalogue and the disk. There is no point in keeping those, as they are unrecoverable and take up disk space.
I will then change the filter to show my picked photos and proceed to the next step of my Lightroom workflow.
Apply Camera and Lens Corrections
Switching to the develop tab and collapsing all the panels, leaving only the lens correction panel open, I will go through each photo and apply the lens correction profile to the camera and lens I am using. I skip this step if I know there are no profiles for my lens, for example, when shooting with my mobile phone or compact camera. For my DLSR, I have presets for each lens. These presets will correct distortion and aberrations, help with vignetting, and help adjust the colour balance in the camera panel.
Photo Editing - Composition, Crop, Rotate
I start with the primary photo editing process with the basic adjustments. From here on, I work each photo through the workflow individually, through the essential adjustments, healing, applying presets, and then adding to a collection before moving on to the next photo.
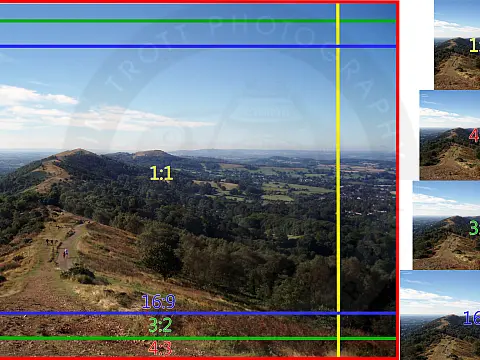
First, I correct the composition if necessary using the crop tool, then use the rotate arrows to adjust the image to ensure everything is nice and level. This should all be done in the camera when you shoot, so this step should only require minor adjustments using the guides to perfect the composition.
Healing - Dust Removal, Spot Heal, Remove Minor Unwanted Elements
Sometimes, dust and hairs get on the camera sensor or lens. It's unavoidable and not detectable whilst on holiday. You can keep this to a minimum by cleaning the lenses and not changing them constantly. Still, some photos will inevitably have spots or smudges. Luckily, Lightroom has a perfect spot-healing tool that can remove most dust and hair marks and even some unwanted elements. I wouldn't say I like to go crazy when removing elements. Still, it's helpful if there is a distracting element or something you didn't notice at the time, like some litter spoiling a view or landmark.

Presets - Adjust Exposure, Curves, Saturation, White Balance
I have a nice set of Lightroom presets to help correct things like exposure, contrast, highlights, shadows, whites, and blacks.
If you don't want to use presets, that's fine; you can use the sliders on the Basic panel in Develop mode. These adjustments will help you correct any exposure issues and reveal the details in your photos. Start by adjusting the exposure to get the image's overall brightness right. Then, adjust the contrast to increase the difference between the light and dark areas of the photo. The highlights and shadows are then adjusted to bring out the details in the bright and dark areas of the photo.
Once I've made the basic adjustments, it's time to move on to more advanced adjustments using the tone curve. The tone curve allows you to adjust the brightness and contrast of specific areas of your photo, giving you more control over the final result. You can use the tone curve to create a more dramatic look by increasing the contrast or a more subtle look by decreasing the contrast. Play around with the tone curve until you achieve the desired effect.
Slide the sidebar down and open the Detail panel. If necessary, I add some noise reduction and sharpening to the image. The exact amounts and types vary depending on how badly the image is affected by noise.
Make Selective Adjustments with Brushes and Filters
One of Lightroom's most powerful capabilities is making specific changes with brushes and filters. This allows you to change the photograph's particular areas rather than the entire photo. A brush, for example, can be used to brighten a subject's face or a filter to add a warm tone to the sky. Select the brush or filter tool from the toolbar, tweak the settings to your desire, and then paint over the area you want to change. It's an excellent way to make your photos look more professional. These tools are used to create highlights or bring out certain features for the finishing touches.
Cataloguing Photos in a Collection
Once I am happy with all the edits and the photo looks as good as it can get, I add the photo to a collection. On the left-hand sidebar, you can add to an existing collection or create a new one. I use collections as galleries; each corresponds with a gallery on my photography website. To add a photo to a collection, drag it to the appropriate collection on the sidebar and drop it in.
Exporting Collections
Once I have edited all my photos, I will export the collection using the Export screen. I set the export location folder, the file format to JPEG, and the quality. If I am exporting to my website, I resize it as well, strip metadata, and add a watermark. With these final steps, your photo is ready to be shared with the world!