The Importance of Watermarking Photographs and How to Do ItWatermarking your photos is essential for protecting your work and ensuring proper credit. Learn how to easily watermark your photos with this step-by-step guide.
Watermarking is a vital step if you are a photographer or want to safeguard your photographs. Watermarking your photographs not only protects them from unauthorised usage but also guarantees that you are properly credited for your work. We'll walk you through the process of easily watermarking your photographs in this step-by-step guide.
Why is Watermarking Important for Photographers?
Watermarking is essential for photographers since it protects their work from unauthorised usage and ensures proper credit for their photographs. The advent of social media and online sharing platforms has made it easier for people to steal and use images without authorization. You can discourage people from stealing and make it clear that the photo belongs to you by applying a watermark to it. In addition, if your images are shared without your permission, the watermark serves as a visual reminder of your ownership and, if necessary, can assist you in taking legal action.

What are the Benefits of Watermarking Photos
Watermarking your photos has many benefits. For starters, it protects your work from unauthorised use. By including a noticeable watermark, others will find it more difficult to claim your pictures as their own or use them without permission. Second, watermarking guarantees that you are properly credited for your efforts. The watermark acts as a visual reminder of your ownership when your images are shared or utilised. This is especially true for photographers who rely on their work for a living or recognition. Finally, watermarking can prevent would-be thieves. By clearly marking your photos with your name or logo, it becomes evident that the photo belongs to you, making it less likely for others to attempt to steal or use it without permission.
Step-by-step Guide to Watermarking Photos
Watermarking your photographs is a straightforward technique that can be accomplished through the use of numerous applications and web tools. Here's a step-by-step tutorial to effectively watermark your photos which you can do in most photo editing programs.
- Select the appropriate software - There are various software alternatives for watermarking pictures, including Adobe Photoshop, Lightroom, and specialised watermarking solutions such as Watermarkly or iWatermark. Select the software that best meets your requirements and budget.
- Create your watermark - Decide whether you want to use a text-based watermark with your name or logo or an image-based watermark. Create your watermark with graphic design tools or use the watermarking tool's pre-made templates.
- Place your watermark where you want it - Decide where you want your watermark to display on your images. It's best to put it in a corner or along the edge, where it won't be clipped or removed.
- Change the opacity and size of your watermark - Change the opacity and size of your watermark to ensure it is noticeable but not overpowering. You want it to stand out but not overpower the main topic of your photograph.
- Save your watermarked photos - Once you're happy with the positioning and appearance of your watermark, save them in a separate folder or file format. To preserve the quality of your photographs, save them in a high-quality format such as JPEG or PNG.
How to Watermark Your Photos with Adobe Photoshop using Actions
You can easily record an action in Photoshop which will then, when played back, add a watermark to the open document. The process is going to be similar to the one above except Photoshop will record everything we do so it can be played back later.
First, access the actions window from the Window menu or press Alt+F9. From here you can create a folder for your action(s), and create a new action. Call it something like "Add Watermark". Now, when you're ready to record the action, click the record button at the bottom of the actions window. Photoshop will record everything you do, so now you can create your watermark. Add in another image, set its size and position, change the opacity, add some text, set a layer style and so on until you're happy with your watermark. When you are happy, just click the stop button.

You can see all the steps recorded by clicking the arrow next to the new action. You can double-click a step to make some changes, change the order or even delete something if it isn't right.
Now when you open an image you can click on the action then press the play button, and the watermark will then be added quickly.
This action can be combined with the Photoshop batch tool. You can use this to convert files from one format to another, add a watermark and save as a JPEG. From the file menu select Automate, then Batch. In the Play section select your watermark folder in the Set drop-down, then your watermark in the Action drop-down. Choose a source and destination folder and any other options you need and then Photoshop will batch convert the photos adding a watermark to each of them.

How to Watermark Your Photos with Adobe Lightroom
To add watermarks to photos when you export them from Lightroom is pretty simple.
First, open Lightroom and click on the Edit menu. From there click "Edit Watermarks". This will open the watermark editor.

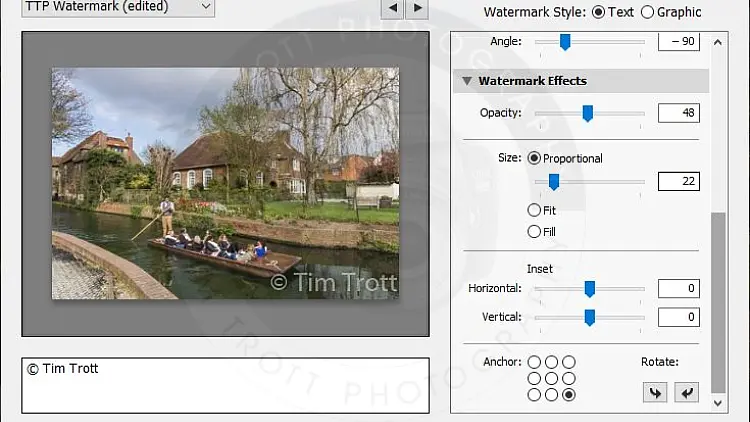
The watermark editor will let you create a watermark using text or a graphic, allowing you to set the text, size, position and opacity. Create a new watermark using this tool then save it using the menu in the top left - Save current settings as a new preset, then click Done.
Next, in the export window, scroll down until you see the watermark section and select your newly created watermark from the list. Now when you export images your watermark will be automatically applied to them.

How to Batch Watermark Photos with ImageMagick
You can batch-add watermarks to photographs by using the ImageMagick software by following these steps. Make sure you have ImageMagick installed on your system before proceeding. If it's not installed, you can download it from the official ImageMagick website .
To add a watermark to a photo use this command:
magick convert input.jpg watermark.png -gravity southeast -compose over -composite output.jpg Let's take a look at this command in detail.
magick convert- This is the command to perform image conversions and manipulations with ImageMagick.input.jpg- Replace this with the name of your input JPEG photograph.watermark.png- Replace this with the name of your transparent PNG watermark.-gravity southeast- This option sets the position of the watermark. In this example, the watermark will appear in the lower right corner of the photo. You can adjust the gravity option to place the watermark in other positions (e.g., `northwest`, `north`, `northeast`, `west`, `east`, `southwest`, `south`, or `center`).-compose over- This option sets the composition operator to "over," which places the watermark over the photo.-composite- This option tells ImageMagick to perform the composition.output.jpg- Replace this with the desired output filename for the watermarked image.
After running this command in your Windows command prompt or PowerShell, the output.jpg file will be your watermarked photograph. You can adjust the watermark position and opacity as needed for your specific use case.
To make this process all photos in a directory simply create a batch file using Notepad (or another text editor) and paste in this command:
@echo off
setlocal enabledelayedexpansion

if not exist ./\watermarked mkdir watermarked

for %%A in (*.jpg) do (
    set "output_file=watermarked\%%~nA.jpg"
    magick "%%A" watermark.png -gravity southeast -compose over -composite "!output_file!"
)

endlocal
When you run the batch file it will create a folder called watermarked if it does not exist, then it will loop over all the jpegs in the folder and add the watermark, saving the resulting images in the newly created watermarked folder.


