Extreme Macro Photography with a Reversing RingThere's a world of detail too small even for a dedicated macro lens to record. Here's how use s reversing ring to get amazing close-ups.
There are several inexpensive ways to go even closer to your subjects than you could with an expensive macro lens, so you don't need a lot of expensive equipment to capture extreme close-up shots.
Simply screwing a lens on your camera backwards is one of the easiest and least expensive solutions. Trust me on this, even if it may sound crazy. You will require an adaptor ring that enables you to reverse your lens in order to use this technique. These adaptors, which run about £10, have a filter thread and a bayonet mount on opposite sides.


You can't use any automatic features with these adaptors since, as their low price would imply, they don't provide an electronic or mechanical connection between the lens and camera. Additionally, there are some restrictions when using lenses made for the majority of modern SLRs. Although you can simply mount these lenses to a reversing ring, there is no aperture control, therefore you cannot change the aperture.
Use a lens with a mechanical aperture ring, like many vintage Canon, Nikon, or Pentax lenses, to solve the problem. Any lens may be used because it is mounted backwards; it is not required to have the same mount as your camera.
When selecting a lens for this project, there are a few things to keep an eye out for. A fixed focal length lens will typically produce the best results, and the shorter the focal length of the lens, the higher the magnification. In my photos below on a 18-55mm lens, 18mm gives the highest magnification, while 55mm gives the least.
How to Get Closer to Your Subjects
How to attach and operate a reversing ring to get jaw-dropping close-ups.

To take the pictures you see here, I utilised a reversing ring and an old kit lens. Make sure the reversing ring adaptor you select has a filter thread appropriate for the intended lens or a stepping ring to modify the thread for various sizes.

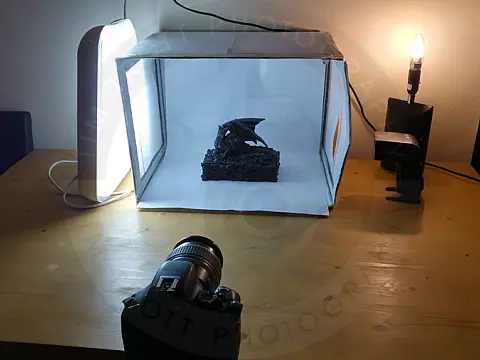
Prepare the subject and the camera. The camera and subject must be firmly fastened in place for clear photographs because even the slightest movement will blur the image.
Pro Tip: Mirror Lock-up - You'll discover that at very high magnifications, even the smallest movement will blur an image. Your photos can be ruined even by the vibration that your camera's mirror causes when it moves out of the way. To ensure you receive sharp results, use your camera's Mirror Lock-up feature, which can be located in the menu.

Consider the lighting. You require a light source that is small enough to be placed conveniently between the lens and the subject when working so closely with small subjects. I sometime use two USB lights that are typically used to illuminate laptops connected to a phone charger. In this image I'm using a multi-LED lights on flexible arms to illuminate the subject.
Reversing Ring Macro Photography Example Images
These images were all taken in a single afternoon whilst playing with the reversing ring using the 18-55mm kit lens. No doubt some practice will improve results somewhat. With no method of focus and such a narrow depth of field a lot of this was hit-and-miss but there were some successes. This is definitely something you need a tripod for and a lens with mechanical aperture control would be beneficial.


Master Focus Stacking
Even when utilising a lens's smallest achievable aperture, the depth of field at extreme magnifications will be so small that just a few millimetres or so of your subject will be sharp. To get around this, you can employ a method called focus stacking, in which you shoot a number of pictures that have different focus points and then combine them using image-editing software.


When utilising a reversing ring on your lens, you cannot shift the focus, thus you must move the camera to take a series of pictures. You will need to fasten the camera to a focusing rail in order to move it in the appropriate little steps. This makes it possible to precisely slide the camera back and forth. If you shop around, the focus rails will cost you around £60, but if you get the macro bug, they will be well worth the investment.