An Introduction to Studio LightingUnlock the secrets of studio lighting with this beginner's guide. From understanding different lighting setups to mastering light modifiers, this guide will help you create professional-looking photos.

Studio lighting is an essential part of photography that drastically improves the quality and impact of your photographs. This article will introduce studio lighting, and you'll learn the methods and ideas needed to create amazing, professional-looking images in a studio setting, from understanding the many sorts of lighting setups to mastering the use of light modifiers.
Understand the Basics of Studio Lighting
Before stepping into the world of studio lighting, it is important to learn the fundamentals. Studio lighting involves illuminating your subject with artificial light sources to achieve the desired effect. The three primary components to consider are the light source, modifiers, and location. A strobe, continuous, or even natural light might be used as the light source. Modifiers such as softboxes, umbrellas, and reflectors are used to shape and control the light. The placement of the lights with respect to your subject can drastically alter the atmosphere and appearance of your photographs. You'll be well on your way to making amazing photographs in the studio if you grasp these fundamentals.

Choose the Right Lighting Equipment
Choosing the correct equipment for studio lighting is important. Your requirements and the style you wish to achieve will determine the lighting equipment you employ. Strobe lights are well-known for their intense bursts of light, which make them ideal for freezing action and taking clear photos. On the other hand, continuous lights give a consistent supply of light and allow you to see the effects in real-time. Natural light can also be a terrific choice if you have access to a well-lit area. Consider purchasing light modifiers like softboxes, umbrellas, and reflectors to shape and manipulate the light. Experiment with various equipment and setups to see which works best for your style and subject matter.

The studio flash is the granddaddy of all flashes. They are substantial and require their own tripod and mains power supply. They also cost a small fortune; however, in a studio setting, they allow precise control over lighting. They have an enormous range and can be used for everything from individual portraits to commercial vehicles and interior shots.

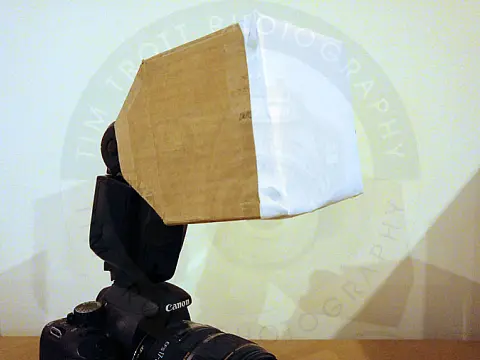
The flash "umbrella" is a diffuser that is used with very harsh studio flashes or strobes. They are positioned so the flash fires into the umbrella and then bounces out onto the subject with a lovely soft light.

External flashes can be triggered in a variety of ways. The simplest is the direct connection to the camera or an extension cable. Infrared or wireless triggers can be used to control flashes over greater distances. These allow independent control over multiple flash units on high-end triggers.
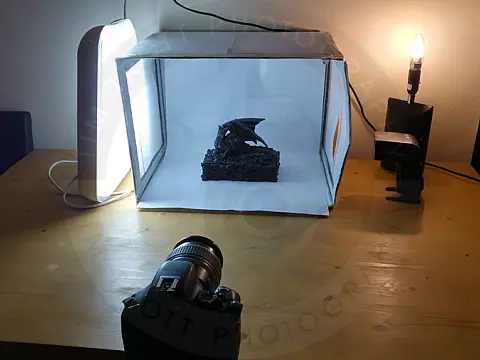
Set Up Your Studio Space
You must first create a dedicated space for your photography before you can begin experimenting with studio lighting. This area should be large enough to accommodate your equipment while allowing easy movement. If feasible, choose a room with plenty of natural light as a starting point for your lighting setup. If natural light is insufficient or unavailable, consider painting the walls neutral to eliminate colour casts. You should also invest in basic studio equipment such as backdrop stands, seamless paper or cloth backdrops, and props to enhance your images. Maintain an organised and clutter-free studio space to ensure a seamless workflow and professional-looking results.

Learn About Different Lighting Setups
Understanding different lighting configurations is key to perfecting studio lighting. You can use a variety of configurations to generate distinct effects and moods in your photos. Two common lighting setups are the three-point lighting arrangement, which consists of a key light, fill light, and backlight, and the Rembrandt lighting system, which generates a dramatic impact with a great contrast between light and shadow. Experimenting with various lighting setups will help you build your distinct style and produce great photographs.
Rembrandt Lighting

Rembrandt lighting is a classic and flattering lighting technique in portrait photography named after the renowned Dutch painter Rembrandt Harmenszoon van Rijn. This lighting style is characterized by a small, triangular highlight on the cheek of the subject on the side of the face that is not fully illuminated. The key feature is the distinct triangle of light below the eye, created by a combination of light and shadow.
How to Achieve Rembrandt Lighting
Place the key light at a 45-degree angle to the subject. The light should come from above and slightly to the side. The goal is to have one side of the face fully illuminated while the other side is in shadow. Position the key light slightly above the subject's eye level to create natural-looking shadows. Ensure the subject's face is turned slightly from the key light. This allows one side of the face to be more illuminated while the other side is in shadow. Observe the formation of a small, triangular patch of light on the cheek on the side of the face opposite the key light. The triangle is formed by the light falling on the cheekbone, and the shadow from the nose creates its base. A reflector can be used on the shadow side to bounce some light back onto the subject's face, filling in shadows while maintaining the Rembrandt effect.

When to Use Rembrandt Lighting
Rembrandt lighting is particularly popular in portrait photography. It adds dimension, depth, and a classic look to portraits. Use Rembrandt lighting when you want to create a sense of drama or mood in your portraits. The interplay of light and shadow adds a certain richness to the image. It works well for character portraits, emphasizing the contours of the face and enhancing features. Rembrandt lighting can convey a sense of introspection or emotion due to the contrast between light and shadow. Rembrandt lighting can be achieved in a studio setting using artificial and natural light. The key is to control the direction and angle of the light source.
While Rembrandt lighting is a timeless and versatile technique, it's essential to adapt it to each portrait's specific needs and style - experiment with positioning lights and reflectors to achieve the desired level of contrast and mood for your photographs.
Backlighting

Backlighting is a photography lighting technique where the primary light source is positioned behind the subject, illuminating it from the rear. This creates a light rim around the subject's edges, separating it from the background and adding depth. Backlighting can be used creatively to achieve various effects, and it's a versatile technique for indoor and outdoor photography.
How to Achieve Backlighting
Place the primary light source (whether it's natural light or artificial lighting) behind the subject. This could be the sun, a flash, or a studio light. Position the subject between the camera and the backlight source. The light source should be coming from behind the subject. Experiment with the angle of the backlight. A slightly off-centre backlight can create interesting effects and avoid lens flare. Since the light source is behind the subject, the bright background might influence the camera's exposure meter. Use exposure compensation or manual exposure settings to maintain proper exposure to the subject. Be aware of the potential for lens flare when shooting into a direct light source. Adjust the angle, use lens hoods to minimize flare, or embrace it for creative effect.

When to Use Backlighting
Backlighting is popular in portrait photography as it creates a beautiful rim of light around the subject, highlighting their contours and adding a sense of separation from the background. Backlighting is excellent for illuminating hair, creating a natural glow and separating the subject from the background. Position the subject before a bright light source when you want to make a silhouette effect. This can result in a darkened subject against a bright or colourful background. Backlighting can enhance the textures of leaves, flowers, and other natural elements. It adds a warm, ethereal quality to landscape photography during sunrise or sunset. Use backlighting for creative effects, such as capturing lens flares and halos or creating a dreamy, atmospheric mood. Backlighting can highlight a product's edges, giving it a polished and professional look. In macro photography, backlighting can reveal intricate details and create interesting highlights. Backlighting can reveal their transparency and enhance their visual appeal when photographing subjects like glass or water.
Backlighting is a versatile technique that allows for creativity and experimentation. It adds dimension to your photos and can transform an ordinary scene into something visually compelling. Experiment with different light sources, angles, and subjects to discover the full potential of backlighting in your photography.
Rim Lighting / Edge Lighting

Rim lighting, also known as edge lighting, is a photography technique where a light source is positioned on either side of the subject to create a highlight or "rim" around the edges of the subject. This technique separates the subject from the background, adding depth and dimension to the image. Rim lighting can be achieved using natural or artificial lighting in various photography genres.
How to Achieve Rim Lighting
Place the light sources on either side and slightly elevated on the subject. This could be the sun, a flash, or a studio lights. Experiment with the angle of the light to find the position that creates a distinct rim or highlight along the subject's edges. Adjust the intensity of the light to achieve the desired level of rim lighting. This can be done by controlling the power of artificial lights or choosing the right time of day for natural light. Choose a background that contrasts with the subject. The rim lighting will be more pronounced when there's a clear distinction between the subject and the background.

When to Use Rim Lighting
Rim lighting is commonly used in portrait photography to add a beautiful highlight to the subject's hair and shoulders, separating them from the background. Rim lighting can create striking silhouettes, especially when the subject is in front of a bright background. Use rim lighting to emphasize textures, such as fur, feathers, or fabric, by creating highlights along the edges. Rim lighting is effective when photographing transparent or translucent objects, revealing their edges and contours. Rim lighting can be used for creative effects, such as creating halos or glows around the subject. In product photography, rim lighting can add a polished and three-dimensional look to the edges of the product, making it stand out. Use rim lighting to highlight specific details or features of the subject, drawing attention to those elements. In nature photography, rim lighting can enhance the outlines of plants, animals, and other subjects, especially during sunrise or sunset.
Rim lighting is a versatile technique that can be adapted to various photography situations. It adds a touch of drama and visual interest to your photos, emphasizing the shape and contours of your subjects. Experiment with different lighting angles, intensities, and subject positions to achieve the desired effect in your photography.
Experiment with Light Modifiers
Light modifiers are essential instruments for modifying and controlling light in your studio. They can soften harsh light, produce fascinating shadows, and add texture and depth to your photographs. Softboxes, umbrellas, reflectors, and diffusers are examples of common light modifiers. Experimenting with various light modifiers can allow you to achieve various effects and improve the overall quality of your photographs. Feel free to experiment with various combinations and strategies to see what works best for your style and subject.